What is it?
Omnichannel Waitlist automatically holds and prioritizes tickets when your team is at capacity, and assigns them as soon as agents become available.
Instead of sending new tickets to Unassigned, Help Desk now places them into a dedicated Waitlist view, where they are ordered, monitored, and automatically assigned based on priority and agent availability.
Why does it matter?
Today, when all agents are busy, new tickets often sit in Unassigned — waiting for someone to notice and manually pick them up.
This leads to:
- - Slower time to first response
- - Missed SLAs
- - Poor experiences for customers who are actively waiting
For CX Managers, the challenge isn’t just assignment, it’s maintaining coverage and consistency during peak demand.
With Omnichannel Waitlist, you can:
- - Ensure waiting customers are not overlooked
- - Trust the system to automatically assign tickets as soon as agent capacity frees up
- - Prioritize work based on urgency (like SLA deadlines)
- - Reduce manual queue management and agent distraction
- - Maintain consistent service levels during high-volume periods
How does it work?
When a ticket is created or handed off from Customer Agent or a bot and all eligible agents are at capacity, Help Desk will:
- - Place the ticket into the Waitlist view instead of Unassigned
- - Order tickets by priority (based on SLA Time to First Response, then wait time)
- - Hold tickets until a matching agent has capacity
- - Automatically assign the highest-priority ticket to the matching support agent
- - The assigned ticket shows in the agent's Assigned to Me and similar views
Within the Help desk Workspace
Waitlist management
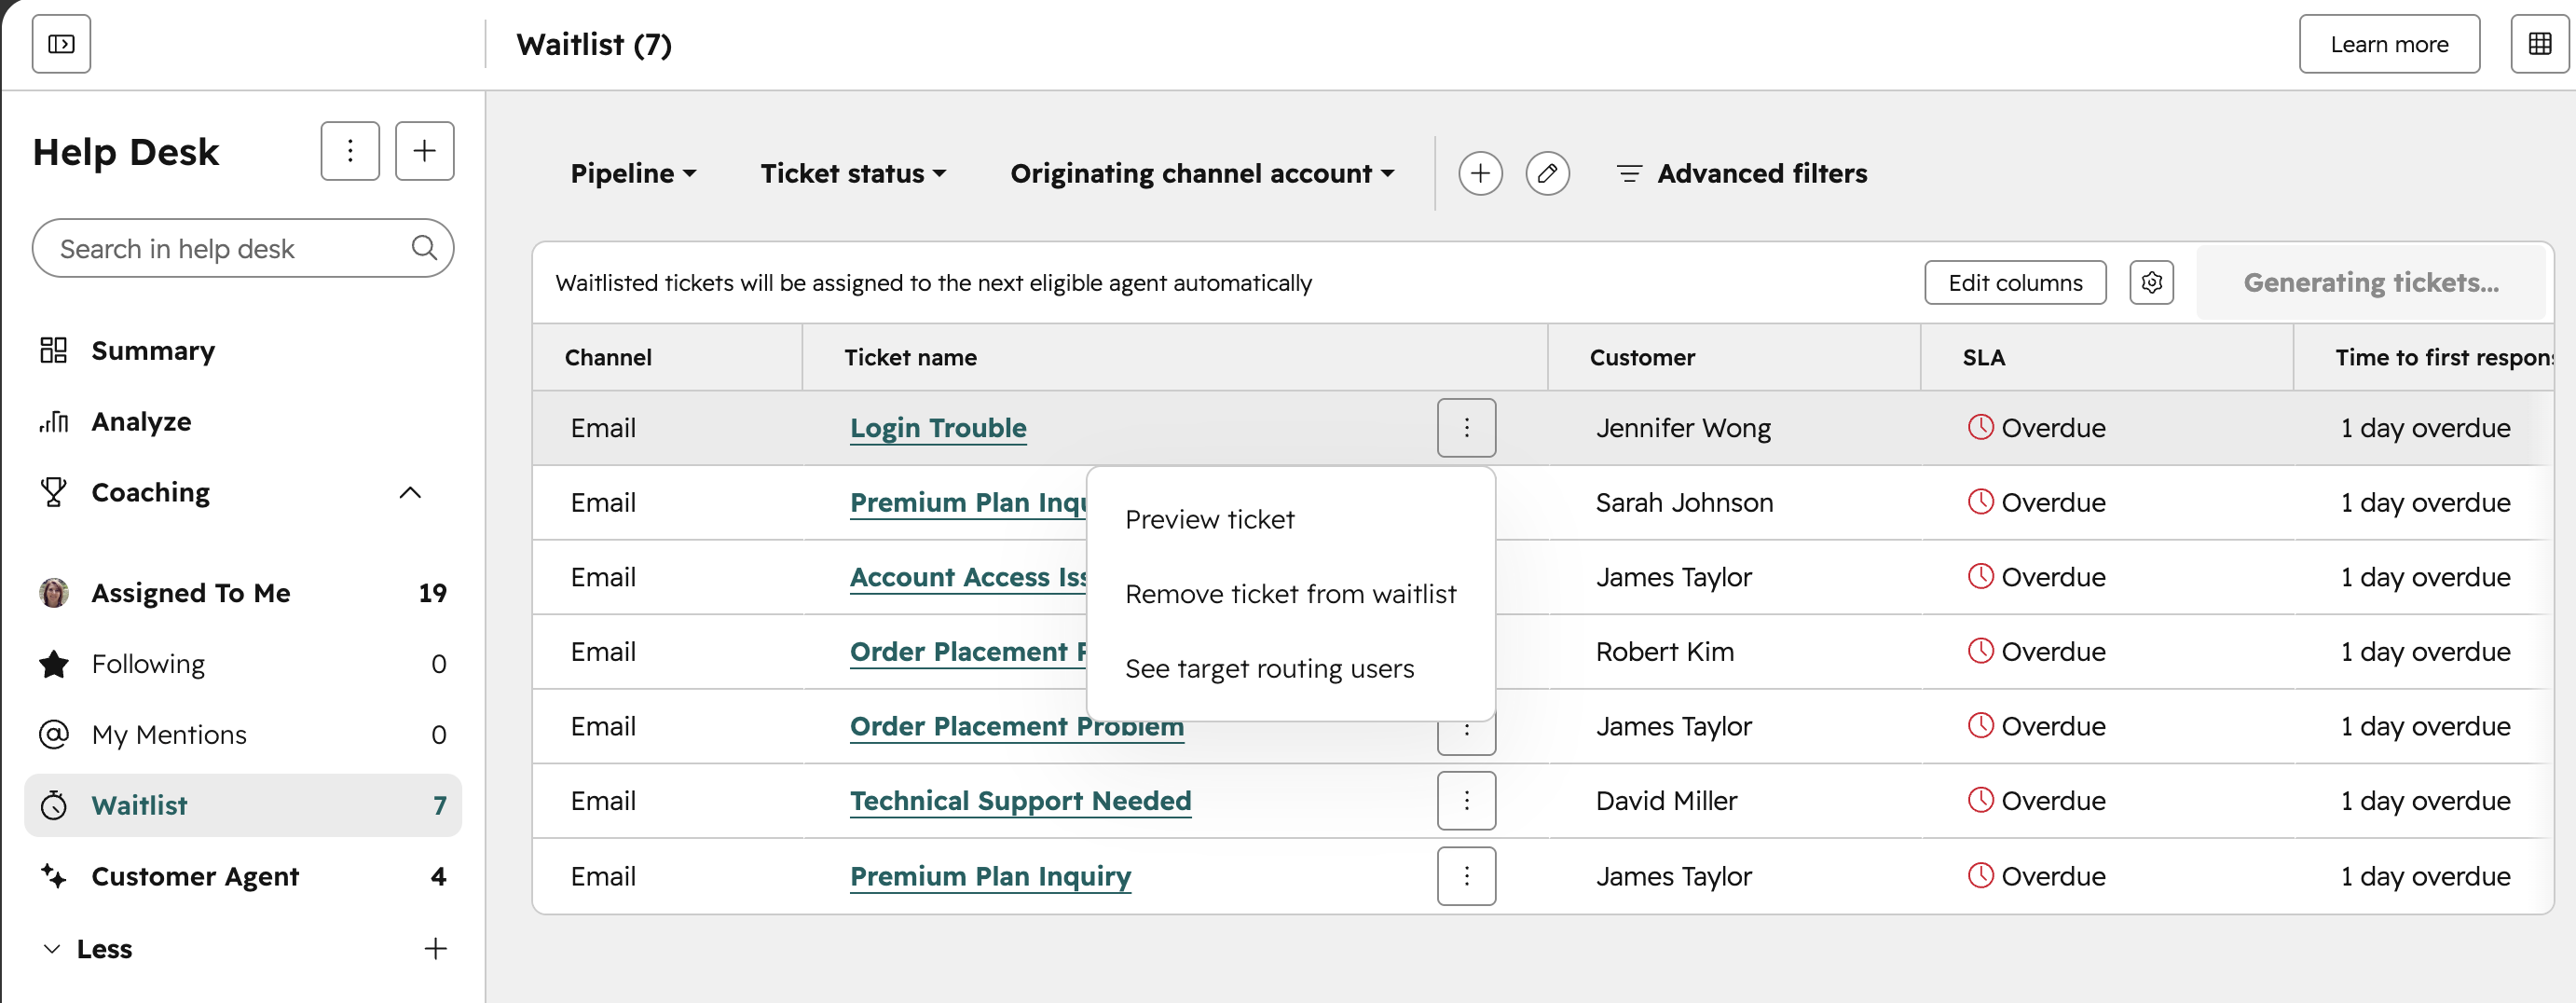
There is a new view called Waitlist that will begin to dynamically fill with tickets when all agents are at capacity and tickets cannot be assigned.
In the Waitlist view, service-seated users can:
- - See wait time and SLA timers for each ticket
- - View the target users, teams, or skills that the system is waiting to assign to once they have capacity
- - Preview tickets to understand customer needs before assignment and possibly deflect tickets to other team(s)
- - Watch tickets automatically move up as others are assigned or removed
- - Note: Customers who have abandoned the call or live chat will be automatically removed from the waitlist
Wrap up time for Calling agents
- - When a call ends, Calling agents will see a new Wrap up timer. This timer gives agents time to finish writing notes before being returned to the pool of eligible agents. Agents can dismiss the wrap up timer if they are ready for the next call before the timer runs out.
Waitlist Configuration (in Help Desk Settings)
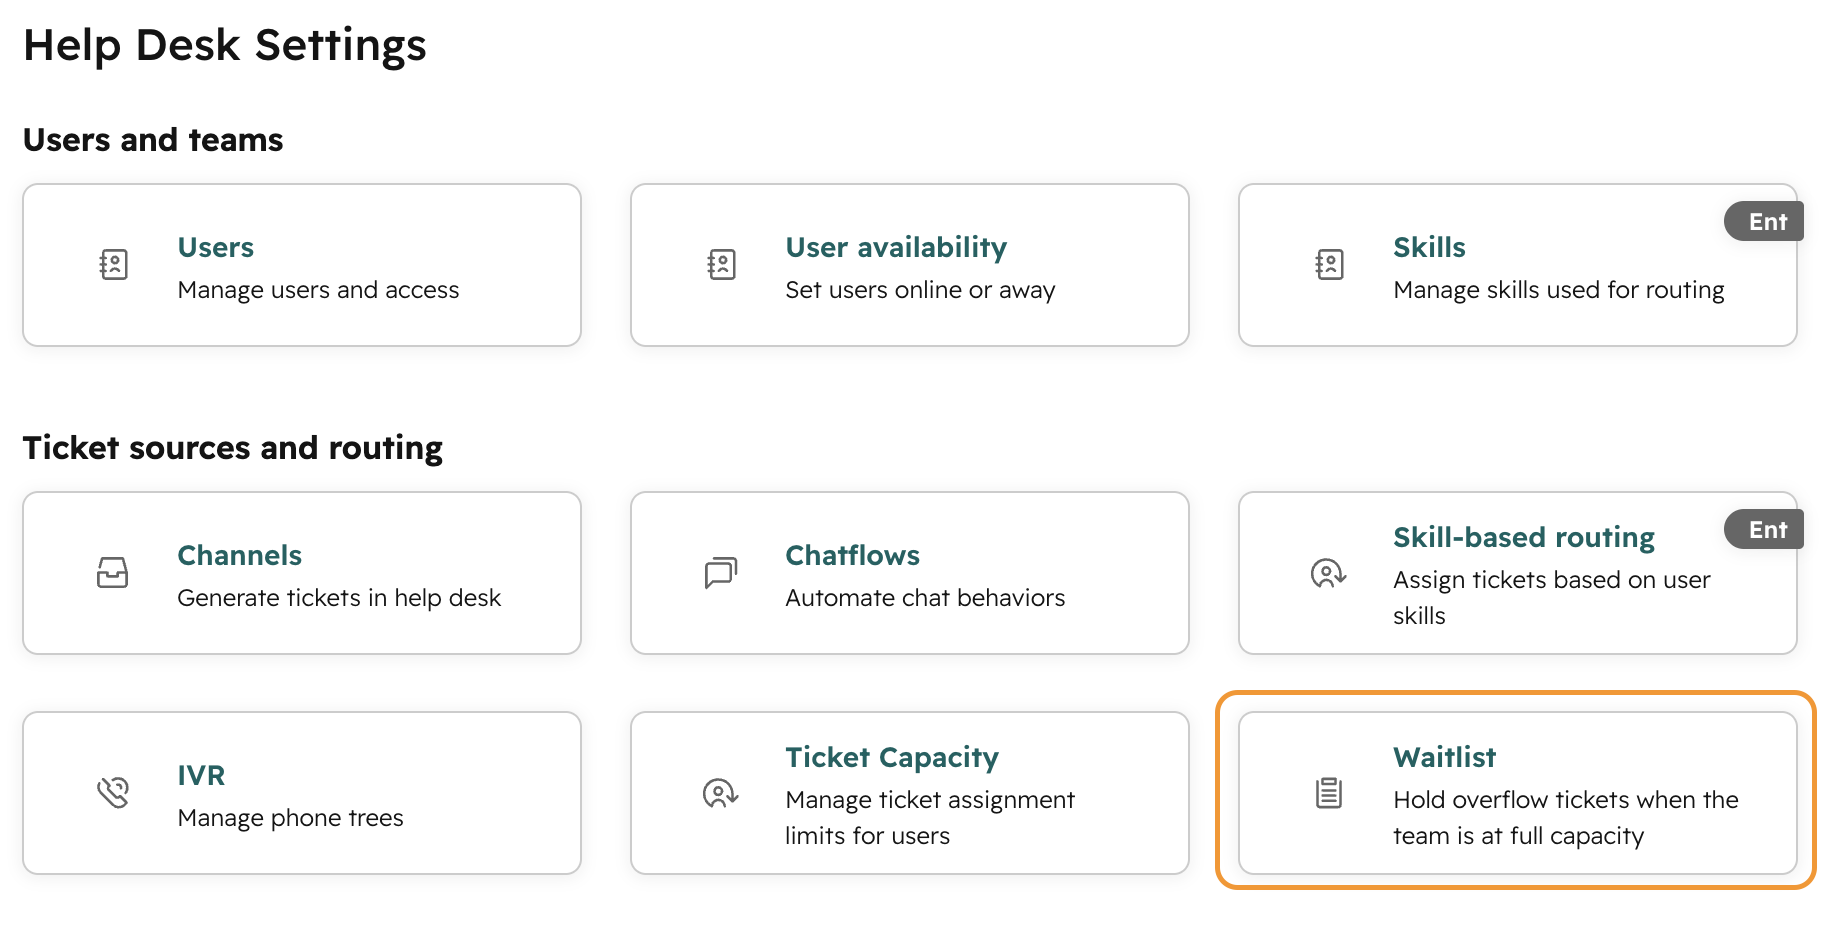
There are a number of configurations available to tailor the waitlist behavior. These settings can be found within Help desk Settings.
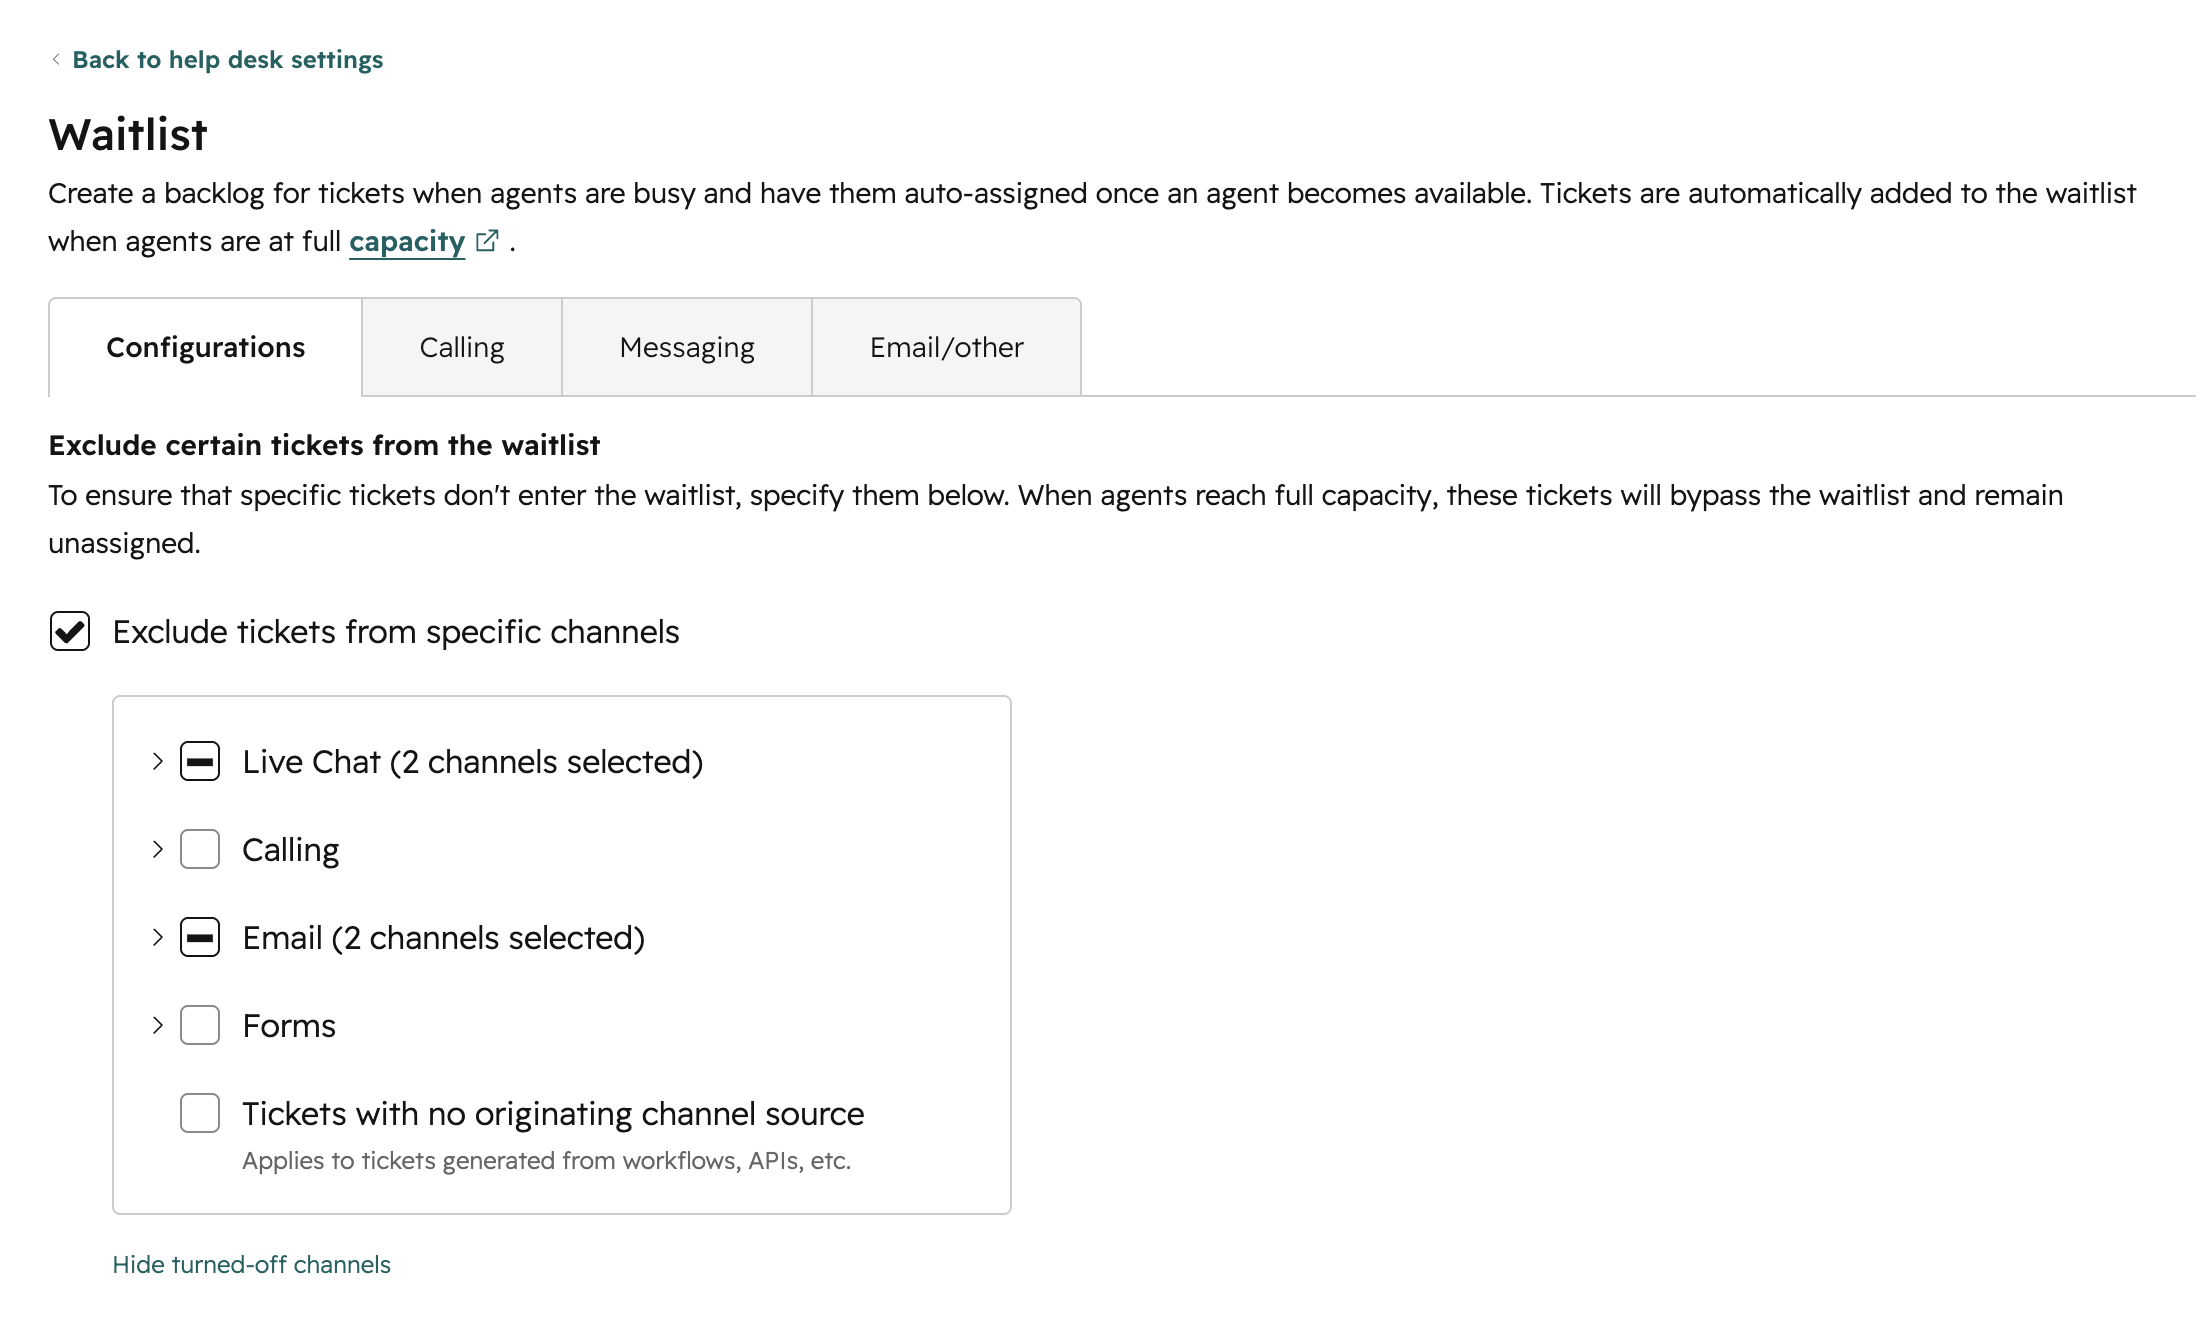
Configure which tickets go to the waitlist
- - Control eligibility by channel type (calling, messaging, email/other) or specific channels so only your most urgent tickets are on the waitlist
- - Align with capacity limits exclusions, so only relevant tickets are included
Set wait time behavior
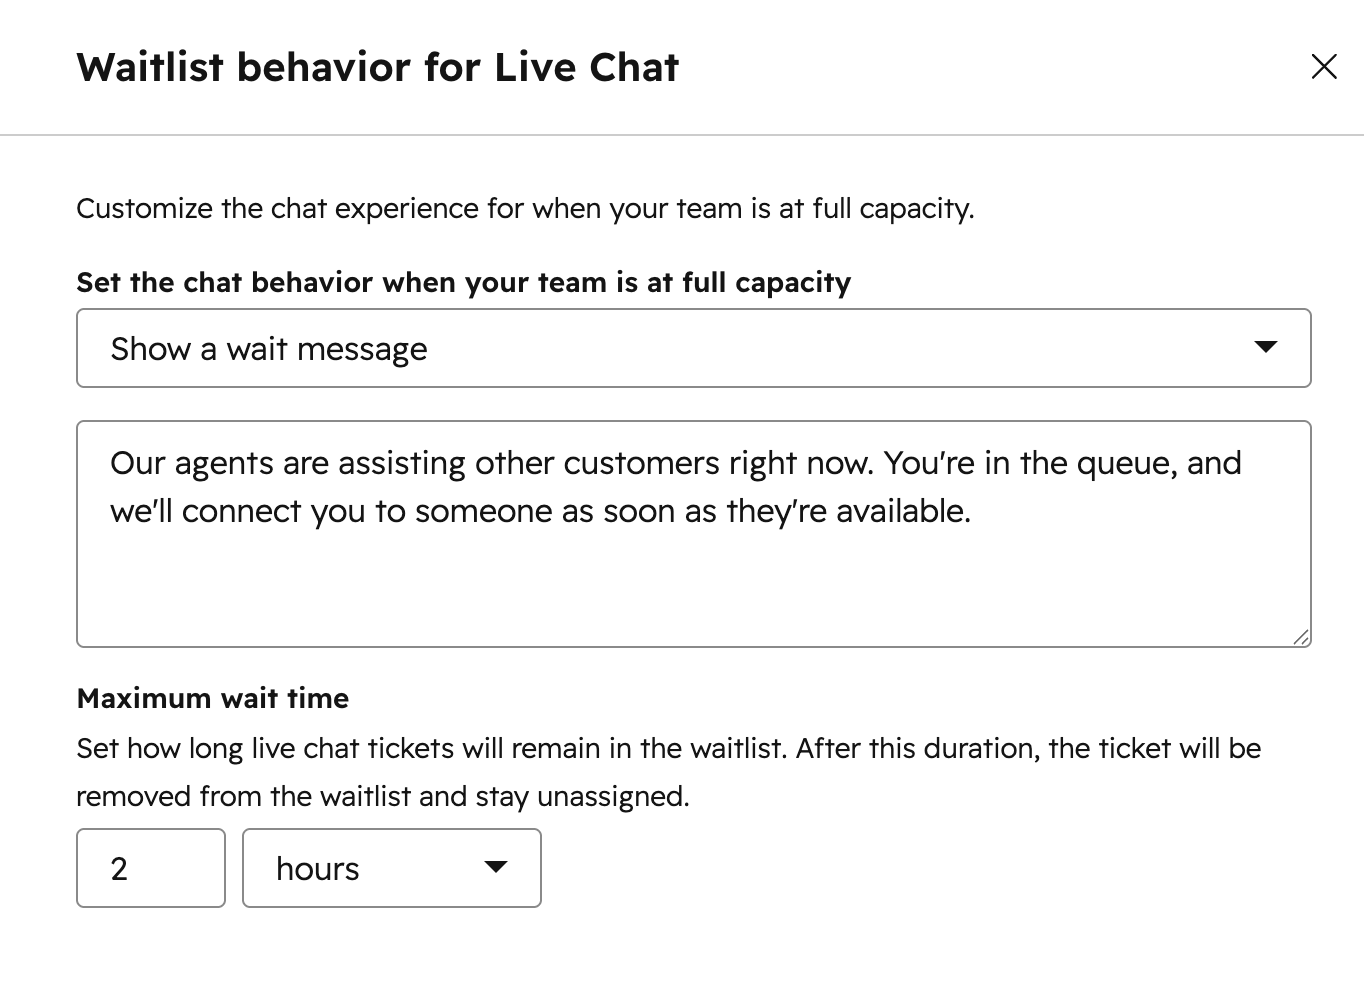
- - Define how long tickets can remain on the waitlist
- - Configure different timeouts for:
- - Calls
- - Messaging
- - Email/other tickets
Wrap up time for Calling agents
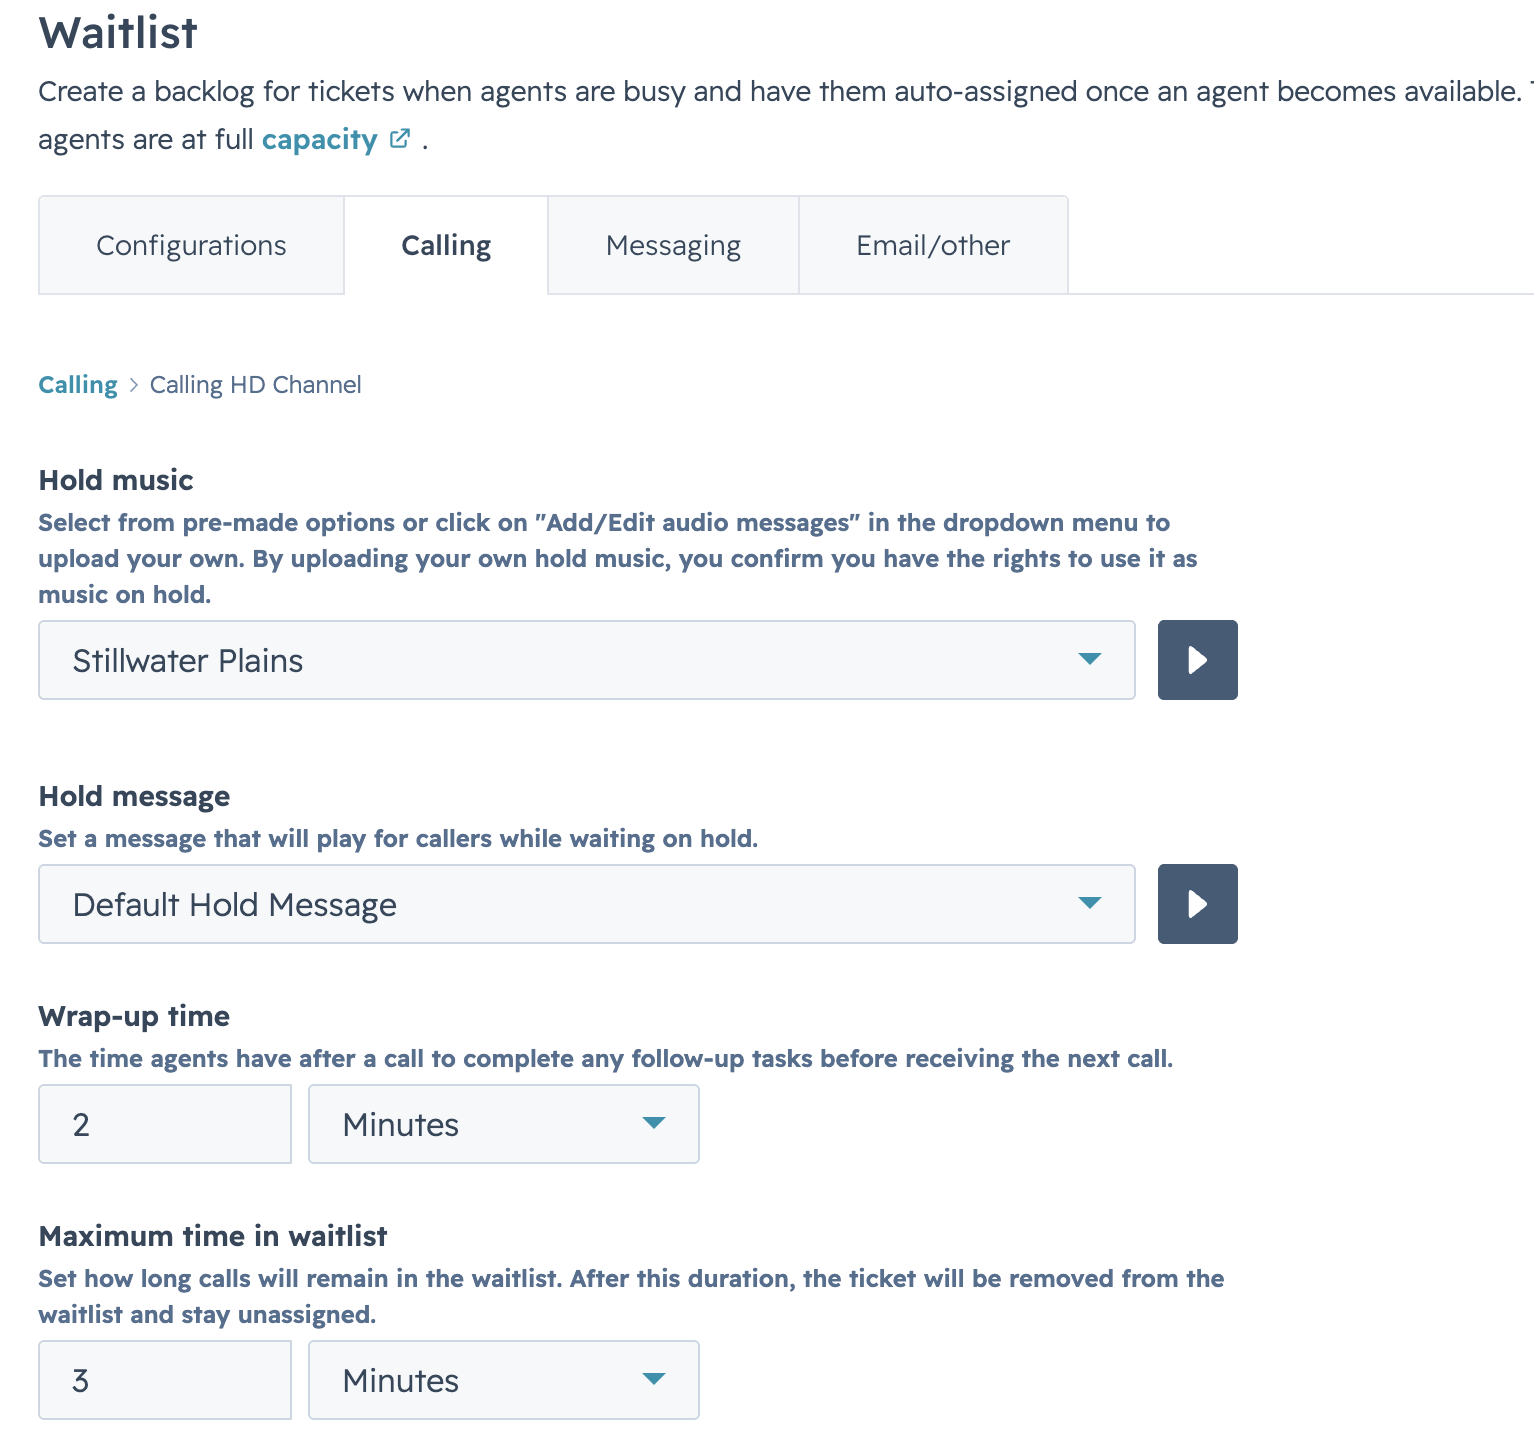
- - Configurable wrap up time to allow calling agents time to take notes before taking the next call
Customized wait messages per channel
- - Provide wait messages for real-time channels (Live chat, WhatsApp, and Calling)
- - Play hold music for calls while customers wait
Callbacks
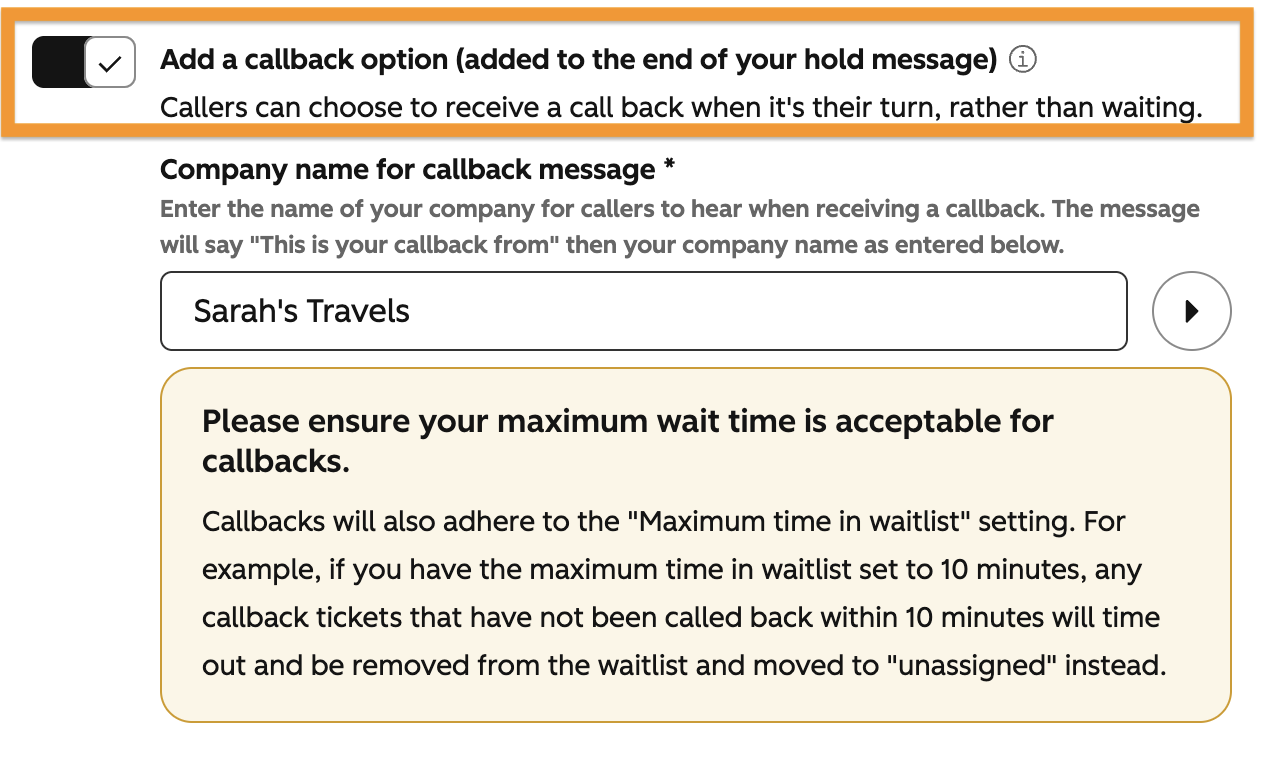
Callbacks give inbound callers an option to exit the queue and give them time back to their day. This helps improve customer satisfaction as callers don't have to sit on hold, they can still get resolution once the reps are ready.
- - Go to Settings -> HelpDesk -> Click on Waitlist
- - Under Waitlist settings -> click on Calling tab
- - Select your calling channel and in settings toggle on "callbacks."
- - Once enabled, set the message you want customers to hear to give them an option to select a callback.
Waitlist Reporting
Custom Report Builder
- - Track and filter which tickets were on the waitlist
- - Report on wait times by channel, team, or other attributes
- - Begin analyzing how wait impacts performance
Additional notes
- - Since waitlist only triggers from agents at max capacity, it is imperative that users have Ticket Capacity Limits configured in order to get the full capabilities of the Waitlist.
- - Calling capacity is set to 1 by default.
- - Available for service-seated Service Hub Professional and Enterprise subscriptions
Who gets it?
Service Hub Professional, Service Hub Enterprise



.png?width=193&name=jos%20(1).png)